Create your own professional blog using Jekyll and GitHub Pages
In this post, we will learn how to create our own professional Jekyll blog using GitHub pages with our own custom domain.

Why we need a blog
We always try to keep our resume as simple as possible and keep its content in one or at most two pages. We provide our GitHub and LinkedIn profile URLs in our resume.
Nowadays recruiters are also looking for open source contributions, articles written, our portfolio etc. Using our own blog we can let the recruiter know about all these. Though this is not compulsory, it adds more chances of getting our resume selected for next round of interview process.
Benefits of having our own blog on GitHub with a custom domain
As mentioned earlier, we can
-
showcase our own portfolio
-
write some articles about anything interesting we solved
-
keep running notes in the blog, if we are learning anything new
-
add one more repository to our list in GitHub
-
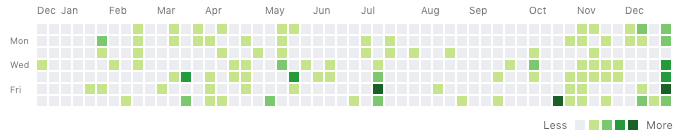
add some more green dots to our GitHub profile page, every time we make any changes to our blog.
I divided this story into 10 steps. They are listed below
-
Buy a domain
-
Setup G Suite Account
-
Create a GitHub repository
-
Find the Jekyll version
-
Install Jekyll
-
Setup Blog
-
Preview Blog
-
Host Blog
-
Update Domain’s DNS Records
-
Add, Preview, and Commit
-
Maintenance
Let’s get started.
Step 1: Buy a domain (Around $10 per year)
It always looks better/cooler if we have our own domain for the blog instead of using a third-party web application URL.
Some tips while selecting a domain
-
Try to stick with .com TLD if possible. It is the default TLD everybody will get in their mind coming to a website.
-
If .com is not available for the name that you are looking for, you can consider .net or .org.
-
Don’t go with some other TLDs, if they don’t make your domain name simpler.
-
Other TLDs may seem cheaper for the first year. But at the time of renewal, we may end up paying more money or we end up stop renewing because of cost.
Some tips while selecting a domain registrar. You can think of Domain Registrar as a website where we buy our domain.
-
Find a registrar who provides DNS management, WhoisGuard for free
-
We just need a domain. Nothing more than that from the Domain Registrar. Don’t get into the trap of adding any other services and end up paying more money
I am using Namecheap for a long time and it is pretty good. It costs around $10 for a .com domain for one year. You can easily find some coupons to get some discount on this price as well.

Step 2: Setup G Suite Account ($5 per month)

I suggest you set up a G Suite account which adds one more cool feature to our resume. i.e.
Which one looks cool?
@ .com Example: sasidhar@sasidhar.com
or
@gmail.com Example: sasidhar1980@gmail.com
Obviously, the first one looks cooler.
Benefits of having a G Suite account for our domain
-
Our custom email becomes a proper Gmail account. I can’t think of any other Email provider which has as many benefits as Gmail have.
-
We can use all the Google stuff with our own email account as the id. Example: YouTube, Google Drive, Google Analytics, Google Play etc.

-
We can have a catch-all email account. A catch-all email account is an email account to which all the emails with no valid email address at our domain will be redirected to. For example
@sasidhar.com will be delivered to my catch-all email account: sasidhar@sasidhar.com -
With a catch-all email account, we can use any email account while trying a new service, including Facebook etc. I can create a Facebook account with facebook@sasidhar.com as the email. Still, I get all the emails delivered to my single email account — sasidhar@sasidhar.com
-
We can add more custom domains as an alias. We don’t need to maintain separate email accounts per domain. Example: I also have a sasidhar.net domain. I added it as an alias in my GSuite account. With this,
@sasidhar.net will also be delivered to my catch-all email account: sasidhar@sasidhar.com -
I found this catch-all email account very helpful while testing our own product, where we need different email accounts with different roles.
-
Even though if you don’t want a blog, I highly recommend, all the QA engineers have their own domain and a catch-all email account, which eliminates creating multiple email accounts with Gmail’s + hack. Hope you know that we can use
+ @gmail.com as a valid email id. Check out more details about this [hack](https://gmail.googleblog.com/2008/03/2-hidden-ways-to-get-more-from-your.html) here. -
I saw many engineers, who have their own domain, but still, they mention their Gmail account in their resume. This step solves that issue.
Check out here for more details about GSuite.
Step 3: Create a GitHub Repository
-
Create a GitHub repository with the domain name. Assuming example.com
-
Check out that repository on your local machine. Assuming it’s location at: ~/projects/example.com
Step 4: Find the Jekyll Version
As we are using Jekyll, let’s find out the latest version of Jekyll here. It is 3.8.5
But, we are hosting the blog on GitHub Pages for free. GitHub Pages may not support all the latest versions of Jekyll. So, let’s find out what it is currently supporting. For this, click here. It is 3.7.4
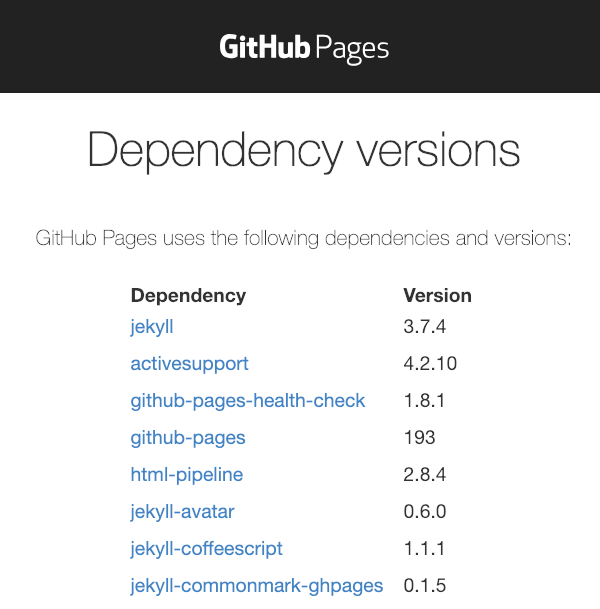
So, we need to go with Jekyll 3.7.4
Step 5: Install Jekyll
Jekyll needs some pre-requisites. Here are they.
[Ruby](https://www.ruby-lang.org/en/)
-
I am using rbenv to setup Ruby on my local machine.
-
Setup instructions are here.
-
I have ruby 2.5.1 on my local machine.
-
Any latest version should be fine as well
➜ ~ ruby –version ruby 2.5.1p57 (2018–03–29 revision 63029) [x86_64-darwin17]
[Bundler](https://bundler.io/)
-
Run this command to install bundler on your local machine gem install bundler
-
I have bundler 1.16.2 on my local machine.
-
Any latest version should be fine as well.
➜ ~ bundler –version Bundler version 1.16.2
[Jekyll](https://jekyllrb.com/)
-
Run this command to install Jekyll on your local machine gem install jekyll -v 3.7.4
-
Make sure you specifyy the version 3.7.4 in the command.
➜ ~ jekyll –version jekyll 3.7.4
Step 6: Setup Blog
Let’s set up the blog now.
-
Open terminal
-
Go to the checked out repository
cd ~/projects/example.com
-
Run the following command. This will create a new Jekyll site in the current folder.
jekyll new . –force
-
Add generated files to git and do first cut commit
git add * git add .gitignore git commit -m “First Cut”
-
Open Gemfile and replace it’s contents with the following
source ‘https://rubygems.org’ gem ‘github-pages’, group: :jekyll_plugins
-
Save it and run following command to install updated gems
bundle install
-
The above command will also update Gemfile.lock
-
Commit updated files
git commit -a -m “Updated Gemfile to use github-pages gem”
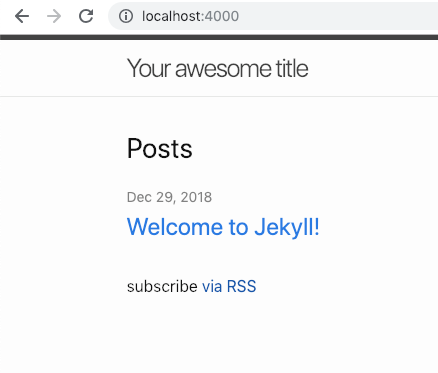
Step 7: Preview Blog
-
Run the following command
bundle exec jekyll serve
-
Open browser and enter URL: localhost:4000
-
If everything goes well, we can see Jekyll default blog page
Step 8: Host Blog
It’s time to host our blog on GitHub Pages
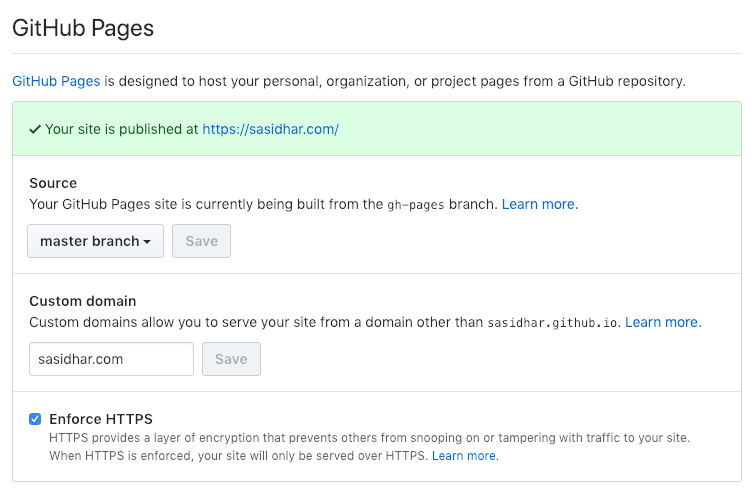
-
Open GitHub Repository in the browser
-
Go to Settings
-
Find the GitHub Pages section
-
From the Source drop-down, select master branch and click on Save button
-
Once the page is reloaded now we can see more options in GitHub Pages section.
-
In Custom domain section, enter your domain name and click Save.
-
Make sure to Enforce HTTPS checkbox is selected. (This checkbox is only available once GitHub finds proper DNS records for the domain. If you don’t see this enabled, re-visit this once you complete the next step, where we are creating required DNS records.)
Above steps will automatically add a CNAME file to our codebase with the domain name that we specified in it.
With this, we are done with all the settings that are needed in GitHub.
Step 9: Updated domain’s DNS records
We can host our blog either on
- the apex domain (also called as naked domain) (domain name without any www or blog etc. prefixes). Example: sasidhar.com
or
- on a specific subdomain. Example: blog.sasidhar.com or www.sasidhar.com
I recommend the apex domain method. In this step, I am adding instructions on setting up the apex domain instead of a subdomain.
For this, we need to access our domain’s DNS records
-
Open your domain settings on the domain registrar website
-
Find DNS or Advanced DNS settings
-
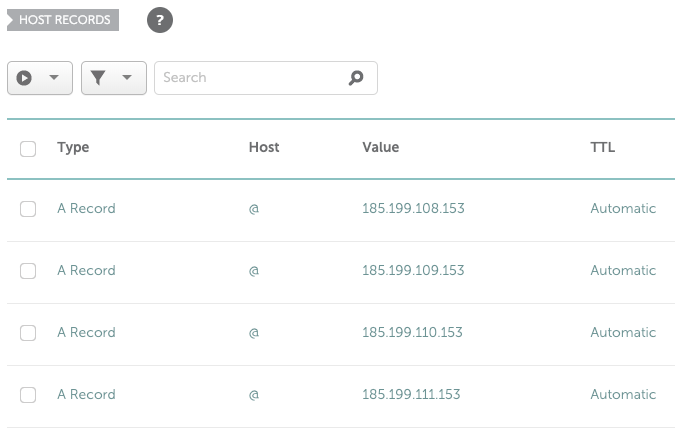
In the Host Records section remove any existing A Record entries
-
Add following four A Record entries
A Record @ 185.199.108.153 A Record @ 185.199.109.153 A Record @ 185.199.110.153 A Record @ 185.199.111.153
-
Why these specific IP addresses? GitHub Pages asks us to add these IP address as A Records
-
To find these IP addresses, use this link.
-
Also, let’s add one CNAME Record as follows
CNAME Record www example.com
-
This record tells us to use example.com when user types www.example.com
That’s It! We are done with all the settings.
It may take some time (many domain registrars say 24 hours) to propagate our DNS changes across the internet. Wait for some time and try accessing your domain and see Jekyll default blog page.
Step 10: Add, Preview, and Commit
All the steps mentioned above are only one-time setup. Let’s look at a typical blog update flow in this step.
-
Open terminal
-
Go to the repository
cd ~/projects/example.com
-
Run the following command to run the blog in watch mode
bundle exec jekyll serve
-
Open localhost:4000 in a browser
-
Open our code base in a Code Editor
-
Make some changes
-
Preview changes by reloading the page in the browser
-
Once everything looks good, commit those changes
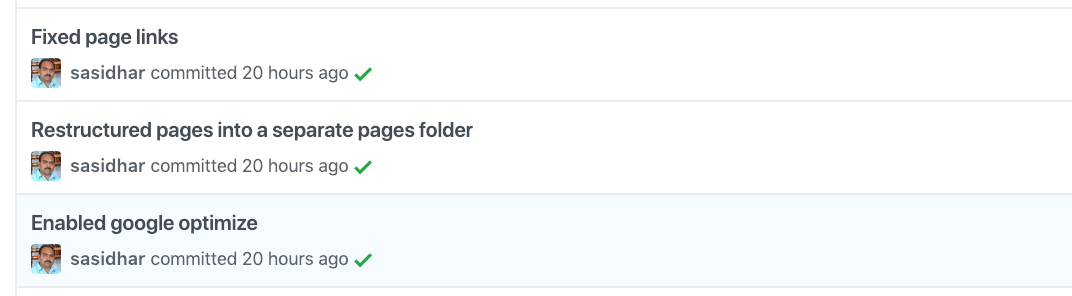
That’s It! We don’t need to do anything else. Once the changes are committed, GitHub automatically deploys those changes to our blog and they are readily available in less than a minute on our domain.
Everytime GitHub pages are built successfully, we can see a green tick along with the commit message in GitHub repository commits on github.com
Step 11: Maintenance
Occasionally we want to make sure that the latest software is used to run our blog. For this follow these steps
-
Open terminal
-
Go to the repository
cd ~/projects/example.com
-
Run the following command
bundle update github-pages
-
Commit updated Gemfile.lock
This will make sure that we are using the latest version of github-pages gem.
Next Steps
Now, it’s time to go through the Jekyll documentation and start adding some pages, posts etc. Some resources are given below
-
Jekyll Documentation: Use this documentation to learn more about building a blog
-
GitHub Pages Gems: Use this link to see what are all the plug-ins that are used along with GitHub Pages. All the dependency names that are started with jekyll- prefix are Jekyll plug-ins and we can use them in our blog.
-
Jekyll Pagination: Use this page to set up some pagination on blog posts.
-
Jekyll Admin: This plugin is not supported by GitHub Pages. But we can use this on our local machine to speed up adding content to our blog. This is a simple admin section to manage the content of a blog. It’s worth checking this. Remember, we can’t access admin section from our domain.
-
Once you have a good amount of content, make sure to add your blog URL in the resume along with other social links like LinkedIn and GitHub
-
Also, make sure to update all your social networking profiles to container your blog URL.
Let me know your comments and concerns.
Happy Blogging!!!